HowTo: Creating Smooth 8-Directional Movement for a 3D Player in Unity
Hey everyone! Its Shelby from the Submersion development team and I'm here to talk about a major process in our development cycle for our upcoming game, and that process is Player Movement!
I believe that player interaction is the most critical element of any game and player movement is a major part of how the user will interact with said game. That being said it's really easy to get right but it is also really easy to mess up! I'm here to help you all not mess it up!
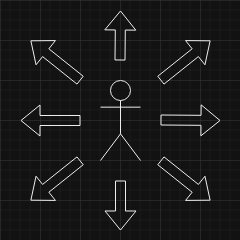
So for starters, what is 8-Directional movement?
8-Directional movement as the name suggests is movement in 8 different directions. It's best to think of the movement directions as points on a compass.
A breakdown of the steps
However you decide to use the 8-Directional movement is up to you, for our game, we're using an orthographic camera angle that looks at the player from above, but this movement can be used on a perspective type character as well, and it can be convenient for a third person game. I'll also show you some additional polishing changes you may or may not wish to implement.
The Player Movement
The player movement requires two major steps: getting user inputs and moving the player based on those inputs. The timeline of operations is going to look something like the flowchart below: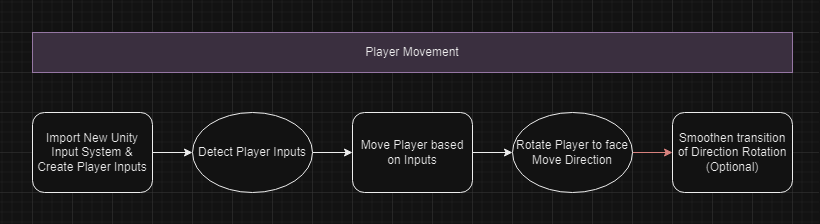
For starters if you have not done so already, go ahead and create a Unity 3D project, I am using version 2022.3.22f1 but it should work on any version newer than that as well. We're going to be using the New Unity Input system for this project since it's pretty robust in what it allows for you to shorten down on the coding end.
Creating Player Inputs
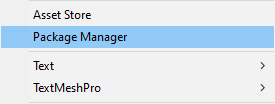
To add the new Input System to your project, go to the top left of your unity editor, click on "Window", then in the dropdown, click on "Package Manager".
At the top of the Package Manager window that opened, make sure that the box that says "Packages" is set to "Unity Registry" so that we can see all packages made by Unity that are readily accessible.
In the search bar in the top right of the window, type in "Input", hit enter and the only search result should be "Input System 1.7.0", click on that and click the "Install" button on the right side of the window to add it to your project.
Now that you've added the Input System package, you can start creating player inputs using an Input Action asset. In your assets folder, right click to bring up a drop down, click on "Create", then on the new drop down of all the different types of assets you can add, scroll down and click on "Input Action". Give it a name and open it up!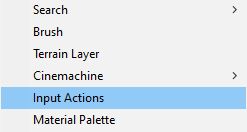
Once you have it open, you're going to create a new Input Action Map. This will store all of your user's input binds.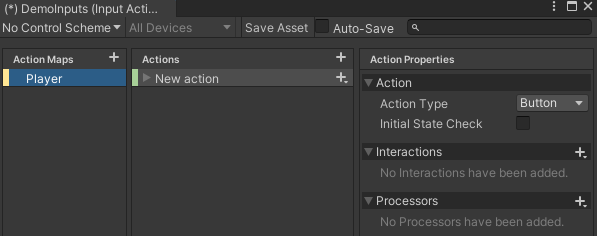
In the middle where it says "New action", rename that to movement. On the right side where it shows the Action Properties, set the Action Type from "Button" to "Value" and then set the new line that says "Control Type" to "Vector 2"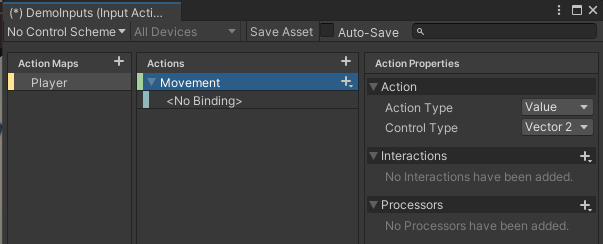
Right click the + button next to your Movement action and add bindings for "Up\Down\Left\Right". Don't forget to then delete the empty binding that is labeled as "<No Binding>".
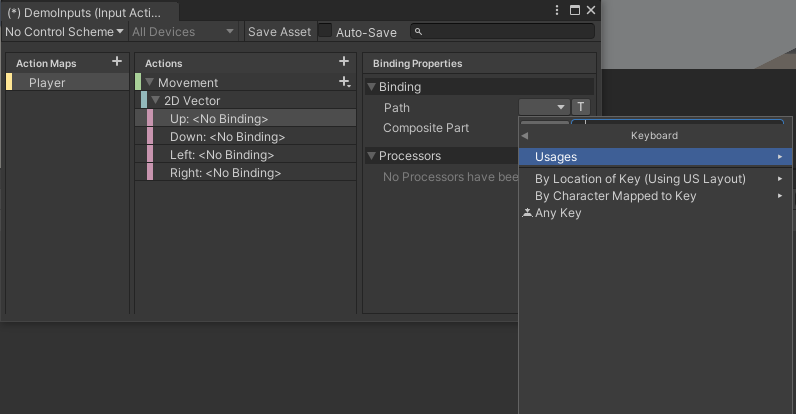
For each of the directions, click on that respective tab, on the right side click on the dropdown next to "Path", right click on the tab labeled "Keyboard", then right click on the back arrow, and it should now say "Listening for Axis". At this point you can press whatever keyboard bind you wish to use.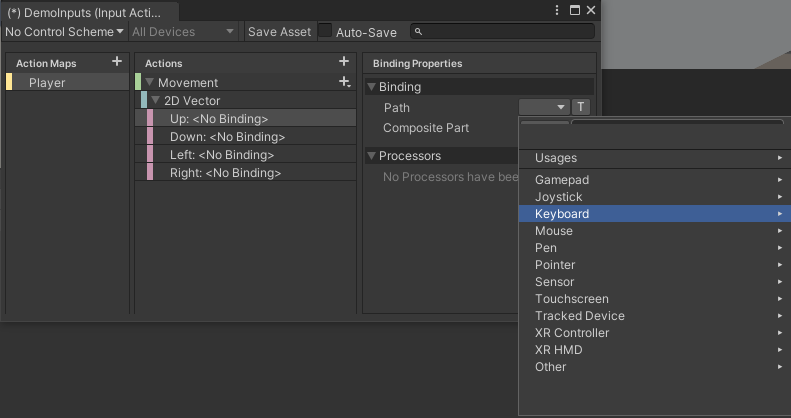
Once you have done this for all four of your directions, click the "Save Asset" button at the top middle of the menu and close this window.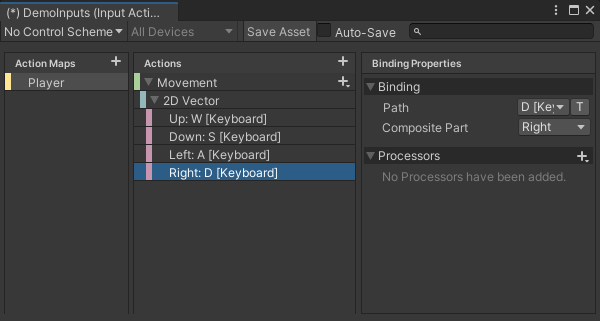
Creating the Player
Now that we have an action map. We need a player that can use it. Below is an image of what my player looks like in the hierarchy: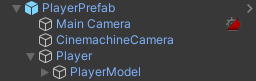
I'm sure you're wondering what each level of this is so I'll break it down for you:
Inside of our "Player" empty game object, we are going to need a few components. Add a Box Collider, a Player Input, and create a new C# script called "PlayerMovement.cs".

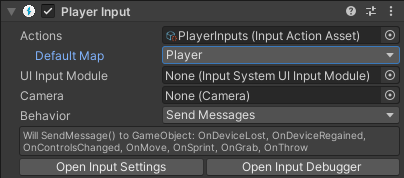
Inside the Player Input component, drag your Action asset that we had previously created into the empty space next to "Actions", then set your "Default Map" to "Player" because that's what we named our Action Map.
This should be all of the setup we need, so now we can actually start programming. Go ahead and open up the PlayerMovement.cs script you just created.
Detecting Player Inputs
There are a few quick changes we need to make the the script to set us up for success. For starters, at the top of the script where your libraries are, add the input system library. The formal code for this is:
using UnityEngine.InputSystem;
So now your library list should look something like the image below: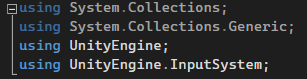
The other small change we are going to make is related to the Update() function. Your script should come default with a Start() and Update() function. We are going to change the Update() to a FixedUpdate(). Because player movement is physics related, we don't want the movement to be frame dependent, so we use FixedUpdate() to execute the code at a predefined rate of speed, rather than every frame per second. Not including the libraries at the top, the only code you should have at this point should look like this: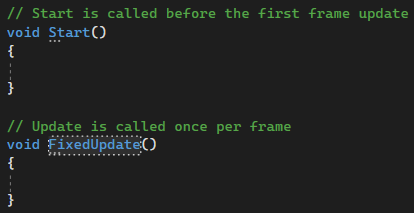
Side note: I would recommend removing the comment above the FixedUpdate() method because that is not how FixedUpdate() operates.
Now that we've completed the script setup, we need to declare some global variables. We needed to add the input system library because it contains some variable types we are going to use. It is worth mentioning that our game uses a sprint button that allows the player to run if that is being held down, this is not strictly necessary and I can show you how this will affect your code in either way. If you decide to add a sprint button, quickly take a second to add a button bind in the action map we previously created, then you can come back to your code. The variables we need to make are as follows:
PlayerInput playerInput; - The Player Input component we attached to our player game object.
InputAction moveAction; - The bind for moving our player.
InputAction sprintAction; - The bind for allowing our player to sprint.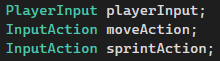
In the Start() function, we need to define each of these variables. Our playerInput is a component, so we can use Unity's GetComponent function to grab that off of our player. The type PlayerInput has several child methods that can be called to access the action. For our purposes, we are going to use playerInput.actions.FindAction(). FindAction() requires a string type parameter, and you'll use the name of your action in the action map we created. So in my case, my action was named Move so my string would be "Move".
The last element to implement for player inputs is the actual detection of the inputs. For this we are going to use a method that uses the Vector2 type that will just return the value of the input. For this we need to use the ReadValue() method.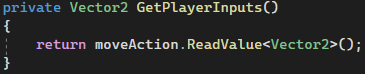
Now you could technically just call the moveAction.ReadValue<Vector2>(); code every time you need to get inputs, but this way we can just call the method GetPlayerInputs(); and it will look a bit cleaner.
Congratulations! You are now able to detect user inputs! If you want to test this out, you can Debug.Log() your Vector2 function in FixedUpdate() and then enter play mode in the editor and just press your keybinds to test it. You'll know you did it correctly if the console is returning something like (1, 0) or (0, 1), and so on. You can also test diagonal vectors by holding down a vertical input like W or S and a horizontal input like A or D at the same time, and you'll see a vector that looks like (1, 1) or (-1, 1), and so on. Next we are going to use these inputs to move our player.
Moving the Player based on an Input
The first step is to declare some global variables again. This time we are declaring variables for movement speed. I am using two separate floats for my walk and run speed.
Just to go into further detail on what some of these extra phrases and words are, SerializeField allows the user to view and change the value of the variable from the Unity editor. This is especially useful when you have multiple of the same component and want to drag and drop a specific one onto that variable from the editor such as two separate colliders. A Header is used for purely organizational purposes for viewing in the editor. It adds a header above the variables to allow the user of the game object to better separate different variables in that script. Note that in order to use the Header your variable either has to be public or has to contain the SerializeField attribute.
Now that we have those variables made, we need to create a method that will be called from FixedUpdate() for actually moving the player. We are going to create a void type method with a Vector2 parameter. Your declaration formatting should look something like this:
private void MovePlayer(Vector2 _direction)
{
}
As a general rule of thumb, I like to first double check that the parameter we are using is not a null variable before we end up using it in the script. This way we can avoid NullReferenceExceptions in the event something happens in play mode.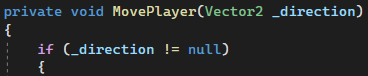
Since we now know the direction is not null, we can use it to move the player. we are going to use C#'s += functionality and translate the position of our player by doing transform.position += (how we implement it). Now our input is a Vector2 but our player moves on a Vector3 space, because we are using Unity 3D. We are going to create a new Vector3 that uses the x axis of our _direction variable for the x of the Vector3, and we are going to use the y axis of our _direction variable for z of the Vector3. Our y variable for the Vector3 can be set to zero as we do not want the movement of our player to also go up and down. We also need to then multiply this entire Vector3 by Time.deltaTime, so that it updates over time and not immediately. Now at this point you can stop coding if you really want to, however the player will be really slow. That is where our movement speed variables come in. Between the Vector3 and the Time.deltaTime, multiply by your movement speed. Your code should now look like this:
transform.position += new Vector3(_direction.x, 0, _direction.y) * walkSpeed * Time.deltaTime;
Now if you have a sprint button and a sprint speed variable, I will show you how to swap between walk speed and sprint speed on the same line of code. We are going to use a ternary operation to check if the sprint key is being held down or not. If it is being held down we will use the sprint speed, if not we will use the walk speed. What this basically does is it will replace the walkSpeed variable from above with a much more in depth check. Assuming you went down this route, your code should look like this:
The last step you need to do is call the MovePlayer() method from your FixedUpdate() method. Because our method has a Vector2 parameter required for it to be called, we are going to call the previously created GetPlayerInputs() method inside of the MovePlayer() parentheses. This works because all the GetPlayerInputs() method does is return a Vector2, so it doesn't do any fancy background work that might conflict with our MovePlayer() method. Inside of FixedUpdate(), the call should look like this:
MovePlayer(GetPlayerInputs());
Congratulations! Now if you enter play mode from the editor you can see that using your movement keybinds will move your player around the world space. We can polish this to make it look much better by having the player model rotate to face the direction in which it is moving, and that is exactly what we are going to do next.
Rotating the Player to face its Movement Direction
We are going to start off by declaring another global variable. We need a declaration for our player model. Simply declare a GameObject type variable and name it something like "playerModel". If you want to make it easier on yourself you can give this variable the SerializeField attribute and just drag and drop the model onto it from the editor, but I am going to show you how to just grab it via code as well.
private GameObject playerModel;
Assuming you did not give it the SerializeField attribute, here is how you can define the game object. Game objects contain a component called a transform, which is used to update the position, rotation, and scale of the object. However, the Transform type also contains a child method called GetChild(). We can use this method to declare our game object as the game object at the desired index we insert into the function. Because our player only has one child object, which is the player model, the index will be 0. from there we will need to ensure we are getting the game object from that method. We can call all of this from our Start() method, and it should look like this:
playerModel = gameObject.transform.GetChild(0).gameObject;
Now we are going to declare another method for rotating our player, the format will be the exact same as our MovePlayer() function but instead we'll call it RotatePlayer(), and we will need that same parameter.
private void RotatePlayer(Vector2 _direction)
{
}
Again, I would strongly recommend making sure the _direction variable is a non null variable before using it. After you have done that, the code is really simple. As stated before, the Transform type allows us to access the position, rotation, and scale of the game object, so for this instance, we are going to use rotation. We are going to access the rotation of our game object by declaring it as playerModel.transform.rotation. then we are going to change the rotation using Unity's Quaternion type. The Quaternion type has a TON of child methods that are all really useful for all sorts of different rotational events. For our case, we are going to use the Quaternion.LookRotation() method to get our game object to look at the angle inside the parameter. We are going to be declaring a new Vector3 as the parameter for this method with our look direction being our _direction x value as our x value for the Vector3 and our _direction y value as the z value for the Vector3. Like for our movement we are going to leave the y value of the Vector3 as zero. Your RotatePlayer() method should look like this:
private void RotatePlayer(Vector2 _direction)
{
    if (_direction != null)
    {
        playerModel.transform.rotation = Quaternion.LookRotation(new Vector3(_direction.x, 0, _direction.y);
    }
}
Now all you need to do is call this in the same way you called the MovePlayer() method inside of FixedUpdate(). You will need to use the same GetPlayerInputs() method as the parameter for your call. Your FixedUpdate() method should now look like this:
void FixedUpdate()
{
    MovePlayer(GetPlayerInputs());
    RotatePlayer(GetPlayerInputs());
}
Congratulations! You now have a player that moves around in 8 directions and faces the direction it moves in! You'll know you did it right if it looks like this!
At this point you can consider yourself done. There are two changes we can make to improve upon this. The first one is smoothing out the rotation a bit more since it looks really static right now.
Smoothing the Player Rotation
In order to smoothen the rotation of the player, we have to do a bit of math. Now before you get scared don't fret because the computer is going to do it all for us. We are going to be using a method called Mathf.SmoothDampAngle() and what this will do is gradually change an angle from one angle to a desired angle. Looking at the parameters of this method, there is a current angle, a target angle, and then a reference to a velocity. We do not want velocity to affect our rotation, so we are going to create an empty float at the global level that we will reference when calling this method. You can name it the same as I have but technically speaking I am using a bad naming convention, however because the variable is completely arbitrary, it really doesn't matter.
Now that we have that set up, locate your RotatePlayer() method. We need to declare a local angle variable inside of this method that uses the float type. We are going to make it so that the value of this angle variable is dependent on the Mathf.SmoothDampAngle() method.
float angle = Mathf.SmoothDampAngle();
Now we need to fill in the parameters for the Mathf.SmoothDampAngle() method. The first one is our current rotation. Because we are going to be rotating around the Y axis, we need to get the y of our player model's rotation. This can be done using Transform.eulerAngles. Which returns the angles of that transform in degrees. So we are going to use playerModel.transform.eulerAngles.y as our current rotation.
float angle = Mathf.SmoothDampAngle(playerModel.transform.eulerAngles.y);
The next parameter is the desired rotation. This requires a little more math as we do not know the desired rotation since it depends on which way the player is moving. Fortunately, the same Mathf struct has a lot of math related methods. We are going to be using two different Mathf methods to find our desired angle, Mathf.Rad2Deg and Mathf.Atan2. Mathf.Rad2Deg converts a value in radians to a value in degrees. Because we are working with world space, we need the value in degrees. Mathf.Atan2 is an arctangent function that takes in a y and x value and returns an angle in radians (hence why we need to convert it to degrees using Mathf.Rad2Deg). Here is where it gets weird. Mathf.Atan2 takes in two parameters, one for a y float and one for an x float, and then it does the arctangent function as y/x, so you would think you would use _direction.y for the y float and _direction.x for the x float, but if you do that and test it, it actually flips the facing direction, making it so that you face the opposite direction of where you are moving. So naturally we just flip the two _direction values and it works perfectly fine. You also need to multiply this Mathf.Atan2 by Mathf.Rad2Deg. The order isn't strictly necessary so you can multiply either by either and it works regardless.
float angle = Mathf.SmoothDampAngle(playerModel.transform.eulerAngles.y, Mathf.Rad2Deg * Mathf.Atan2(_direction.x, _direction.y));
The next parameter is the reference to a velocity. If you recall we said we did not want velocity to affect our rate of rotation, so we will just call our previously created arbitrary float value for this.
float angle = Mathf.SmoothDampAngle(playerModel.transform.eulerAngles.y, Mathf.Rad2Deg * Mathf.Atan2(_direction.x, _direction.y), ref r);
The last parameter we need is the smoothing time for the angle. The Unity API does not strictly state a unit of time but I assume it is in seconds. You probably want this to be a really small number but it is also going to be trial and error to find what fits your game best.
I know that was a lot of work just to get an angle but I promise it pays off in the end. The last step is really easy. Rather than using Quaternion.LookRotation(), we are going to use Quaternion.Euler(), which takes in an x, y, and z float and sets the rotation of the object based on those values. Since we are rotating around the Y axis, our x and z values will both be zero and our y value will be our angle float variable that we just got done making.
Assuming you did all this correctly, you can hop back into play mode and you'll find that the rotation between directions is much smoother!
There is just one more thing we can do to improve upon this and that is making it so that upon release of the keybind, your player will continue to face the direction they were facing while moving. If you enter play mode now and move around then release, you'll find that the player returns to their original facing direction when no inputs are provided. This might not look bad to you which is totally fine but just in case I'll show you how to fix it!
Keeping the Player facing their Move Direction
Locate your RotatePlayer() method and we are going to add one more if check inside our null reference check. We are going to check if _direction is equal to Vector2.zero which is literally just a Vector2 with a value of (0, 0). This is also what the input check will return if no inputs are being provided. You want to make sure that the if statement is checking if _direction is NOT equal to Vector2.zero or otherwise your rotation code will only run when there is no input being provided.
You will now find that if you enter play mode and walk around and then release your input keybind, your player will continue to face the direction it was just facing.
An important thing to note, if you want gravity for your player, you can add a Rigidbody component to the same game object that has this script on it. Gravity should be on by default and I would just recommend you set the collision detection to "continuous" and you setup your constraints to freeze rotation of the rigidbody on all axis'.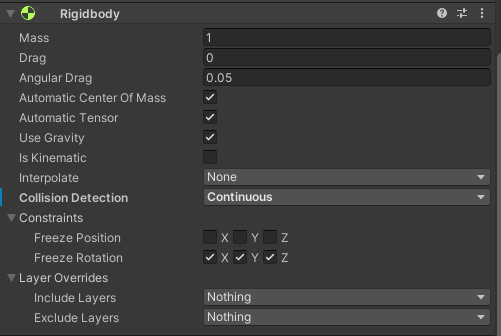
Congratulations! You have successfully implemented 8-Directional movement with smooth dynamic rotations and gravity! That wasn't so hard was it?
If you have any questions for me relating to how I created this or any questions for the Submersion development team, feel free to ask them in the comments! I look forward to showing y'all our game when it releases and I hope you guys stick along for the ride!
Leave a comment
Log in with itch.io to leave a comment.